
First up, I had to make molds for the concrete. For the molds, I found scraps of wood that I cut on my table saw. We wanted the stones to be hexagons, so I cut six pieces and then screwed them together using short black drywall screws.
It's hard to screw pieces of wood together without them sliding around or getting separated from each other. The solution to this problem is to first drill pilot holes through both pieces, slightly smaller than the size of the screw. Then drill another pilot hole through the piece of wood that the screw first goes into. This second pilot hole must be wider than the screw itself. This way, when you screw them together, the screw goes right through the first piece and then grabs the second piece and brings them together tightly and neatly, without any shifting of the pieces.
In doing this project, we made stones out of various concrete mixes, but eventually we found that the regular old "quikrete" type mix works just fine. For us, we used the "Sakrete" product made here in Texas.
We've made a lot of different stones, using a good variety of different decorative materials.


One material that we found quite interesting to work with was shards of broken glass. ATP member Bubbles was kind enough to send us a box of broken and tumbled glass that the city of Austin provides. With this glass, we were able to make some really interesting and beautiful shapes in the stones.
The first step was to design and draw or print out on paper what we wanted on our stones. I then laminated these using 3ml plastic lamination, then carefully cut the designs out using a razor blade.


We then setup a table outside, put a piece of plywood on the table, and then covered them with some nice smooth plastic political signs which acted as the perfectly smooth base on which to work.


Time for concrete! I found that one full 80lb bag makes exactly 6 of our hexagon stones, so I empty the bag into my wheelbarrow and mix it up while slowly adding water. You don't want the mix too wet and slurry. It needs to still be fairly lumpy yet well mixed up. In the photo below, the concrete in the center section of the wheelbarrow is starting to look pretty good. The part on the right is too slurry, and the part on the left isn't wet enough. I kept mixing with my hoe until it was all evenly mixed.

I dump concrete about half-way full into the mold, then smooth it out a bit.

Since we'll be walking on these stones every day, I'm pretty picky about strength and longevity on these stones, so we then added bits of metal to the concrete. This metal reinforces the concrete and makes them significantly stronger.


Then we cover that metal with more concrete, all the way up to the brim of the mold. The top is smoothed out using trowels and then it's time to start having fun!
We place the cut-out on top of the concrete, and then we put the bits of glass into the part that was cut out.


Here is a video that shows us in the process of laying this glass down:
Once this is done, it's time to pat the glass down into the concrete really well. We covered up the shards with a spare piece of laminated paper, and tamped it down with a block of wood.

Once the glass was pretty well pushed down and smoothed into the concrete, we then remove the paper sheet and are left with the glass and concrete alone. At this point, I used a piece of laminated paper to brush concrete from around the surface of the stone to cover the shards. Watch the mesmerizing video below to see the method demonstrated:
As you can see, this process is done very gently. I just gently moved the smooth piece of paper from the non-covered area over the covered area. It brought small amounts of concrete with it as I moved, and pretty soon the design was completely covered with a very thin layer of concrete.
| There's a Texas hiding under this concrete! | Yes, that's a star somewhere. |
 |
 |
Here is the full view of the Texas stone:

Now is the time to wait. We did these stones in the morning, around 8:00am. But the evening, the glass shards were ready to be cleaned off. I sprayed the stones with a light mist of water, and then used a soft brush to clean off the glass. When I was done, I had the below:
 |
 |
As you can see, once the excess film of concrete was carefully brushed off, the perfect pattern of glass shards is revealed. So, 24 hours later I took these stones out of their molds by removing just one screw, and the mold comes off easily. The stones then get dunked completely under water where they stay for a month while they finish curing.
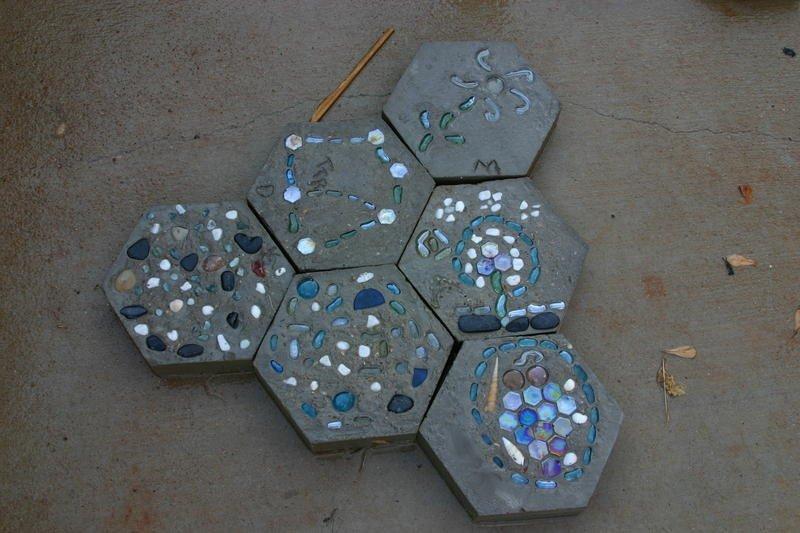
Here is a closeup picture of more stones that we made using this glass shards technique:

Something to keep in mind when working with concrete is that it is not glue! You can't just set something on top of the concrete and expect that it will hold. The little stones or shards need to be embedded in the concrete, halfway buried so that the concrete can wrap around the stones and once cured "hug" it into place. Too many times people just set their stones down on top of the concrete and barely push them in, and not long later the stones just fall right off. So make sure you push those stones down deep and then "smoosh" the concrete around.
Don't be afraid to thinly cover the decorative stones. It's easy to brush off the excess concrete 12 hours after the concrete has started to set.
I hope this tutorial has inspired you to make your own stepping stones!
| Thread Title | Last Reply | Replies |
|---|---|---|
| stepping stones by 2ofus | Feb 19, 2016 10:39 PM | 0 |
| My stepping stone project by Dinu | Dec 7, 2014 9:15 AM | 0 |
| Another method I have used. by Budgielover | Dec 6, 2014 4:21 PM | 5 |
| Stepping stones by Watersprite | Dec 6, 2014 3:46 PM | 2 |
| Finished Product? by beckygardener | Dec 6, 2014 8:57 AM | 20 |
| What an amazing tutorial by Boopaints | Feb 15, 2013 8:34 PM | 32 |
| Puddling by crittergarden | Jun 1, 2012 2:54 AM | 3 |
| Want some shells? by AlohaHoya | Oct 20, 2011 10:52 PM | 2 |
| Untitled by crittergarden | Oct 19, 2011 12:39 PM | 1 |
| Great job by Calif_Sue | Oct 16, 2011 11:33 AM | 9 |
| How deep are the molds? by JuliaNY | Oct 14, 2011 7:09 PM | 1 |


