Hypertufa, the Look of Carved Stone

By goldfinch4
March 26, 2010

Do you like the looks of carved stone planters? Then hypertufa is for you. Here is my recipe and instructions on how to make your own unique trough, bowl, or box.

[View the item]

Image
Jun 23, 2010 5:36 PM CST
Thread OP
Name: Randy
Central IL
I was one of the first 300 contributors to the plant database!
How do you make the small pinch pots? What are you using for molds for them? Thanks
Image
Jun 24, 2010 12:13 PM CST
Name: Chris
Ripon, Wisconsin
Charter ATP Member I was one of the first 300 contributors to the plant database! Garden Sages Garden Ideas: Master Level Seller of Garden Stuff I sent a postcard to Randy!
Sempervivums Sedums Region: Wisconsin Hosted a Not-A-Raffle-Raffle Celebrating Gardening: 2015 Avid Green Pages Reviewer
Hi Randy,

Believe it or not, I just use a Ziplock sandwich bag! Thats why they're all shaped a bit different, just molded by hand. I just put a blob of tufa in the bag and squish it around by hand until it's the shape I like.
Image
Jul 1, 2010 5:31 AM CST
Thread OP
Name: Randy
Central IL
I was one of the first 300 contributors to the plant database!
Hey thanks I will try that this week end, those are really nice. Thank you for info.
Image
Jul 1, 2010 5:40 AM CST
Name: Chris
Ripon, Wisconsin
Charter ATP Member I was one of the first 300 contributors to the plant database! Garden Sages Garden Ideas: Master Level Seller of Garden Stuff I sent a postcard to Randy!
Sempervivums Sedums Region: Wisconsin Hosted a Not-A-Raffle-Raffle Celebrating Gardening: 2015 Avid Green Pages Reviewer
Any time! They are fun little pots that you can stick anywhere!
Image
Jul 1, 2010 5:57 AM CST
Name: Kin
Willamette Valley, OR.
Zone 8a
I was one of the first 300 contributors to the plant database!
That is such a great and simple idea to make pinch pots! Thanks for asking, Randy
And
Thanks for the article and sharing your secret too pinch pots, Chris Big Grin
Image
Jul 1, 2010 6:04 AM CST
Name: Chris
Ripon, Wisconsin
Charter ATP Member I was one of the first 300 contributors to the plant database! Garden Sages Garden Ideas: Master Level Seller of Garden Stuff I sent a postcard to Randy!
Sempervivums Sedums Region: Wisconsin Hosted a Not-A-Raffle-Raffle Celebrating Gardening: 2015 Avid Green Pages Reviewer
You're welcome Kin. I'm more than happy to share anything I can. It's a small exchange for everything I learn from all of you! I started making them to use up tufa that was left over from other projects. Seemed a shame to just throw it out. Smiling
Image
Jul 1, 2010 6:17 AM CST
Name: Kin
Willamette Valley, OR.
Zone 8a
I was one of the first 300 contributors to the plant database!
I think I may just give it a try today. I have a lot of little chicks that need homes soon! Thumbs up
Image
Jul 1, 2010 6:34 AM CST
Name: Chris
Ripon, Wisconsin
Charter ATP Member I was one of the first 300 contributors to the plant database! Garden Sages Garden Ideas: Master Level Seller of Garden Stuff I sent a postcard to Randy!
Sempervivums Sedums Region: Wisconsin Hosted a Not-A-Raffle-Raffle Celebrating Gardening: 2015 Avid Green Pages Reviewer
Fantastic - be sure to show us pictures!!
Image
Jul 1, 2010 6:43 PM CST
Thread OP
Name: Randy
Central IL
I was one of the first 300 contributors to the plant database!
Well I busted the baggie on this first try think I need thicker bag, got any tips? and what recipe are you using? I need more materials for the weekend for some projects my sister wants a dish for some hens and chicks.Think she may be hooked.
Image
Jul 2, 2010 1:51 AM CST
Name: Chris
Ripon, Wisconsin
Charter ATP Member I was one of the first 300 contributors to the plant database! Garden Sages Garden Ideas: Master Level Seller of Garden Stuff I sent a postcard to Randy!
Sempervivums Sedums Region: Wisconsin Hosted a Not-A-Raffle-Raffle Celebrating Gardening: 2015 Avid Green Pages Reviewer
Hi Randy,

I use 1 part Portland cement, 1-1/2 parts Perlite and 1-1/2 parts Peat. I use the Ziplock sandwich bags so I don't know if they're thicker than other ones or not. The amount of tufa I put in the bags is maybe about 3/4 full so I can fold the top of the baggie down toward the inside of the pot when firming up the sides. I'll make one this weekend and take some pictures to post.

Fun to get your sister hooked!! I'm working on my sister too, I've already succeeded with my Mom.
Image
Jul 2, 2010 7:38 AM CST
Name: Lynn
Oregon City, OR (Zone 8b)
Charter ATP Member Garden Sages I helped plan and beta test the plant database. I helped beta test the Garden Planting Calendar I was one of the first 300 contributors to the plant database! Plant Database Moderator
Forum moderator I helped beta test the first seed swap Million Pollinator Garden Challenge Celebrating Gardening: 2015 Plant and/or Seed Trader Garden Ideas: Master Level
Hurray! Wonderful Chris, I really love the pictures, it's easier for me to understand.
Image
Jul 6, 2010 1:52 AM CST
Name: Chris
Ripon, Wisconsin
Charter ATP Member I was one of the first 300 contributors to the plant database! Garden Sages Garden Ideas: Master Level Seller of Garden Stuff I sent a postcard to Randy!
Sempervivums Sedums Region: Wisconsin Hosted a Not-A-Raffle-Raffle Celebrating Gardening: 2015 Avid Green Pages Reviewer
Finally have the pinch pot tutorial ready.

This is the bag I use for a "mold" - a Ziplock sandwich bag. I fold the top edge over just to give it a little more stability when I'm putting the tufa in.

Thumb of 2010-07-06/goldfinch4/a76720
Image
Jul 6, 2010 1:55 AM CST
Name: Chris
Ripon, Wisconsin
Charter ATP Member I was one of the first 300 contributors to the plant database! Garden Sages Garden Ideas: Master Level Seller of Garden Stuff I sent a postcard to Randy!
Sempervivums Sedums Region: Wisconsin Hosted a Not-A-Raffle-Raffle Celebrating Gardening: 2015 Avid Green Pages Reviewer
Here is a picture trying to show the consistency of the tufa mix. It's not crumbly at all. You can see that its wet, but not so wet that water drips off. When squeezed it sticks together very easily.

The mix consists of 1 part Portland Cement, 1-1/2 parts Perlite, 1-1/2 parts Peat and just enough water to make solid lump when squeezed.

Thumb of 2010-07-06/goldfinch4/68b602
Image
Jul 6, 2010 1:57 AM CST
Name: Chris
Ripon, Wisconsin
Charter ATP Member I was one of the first 300 contributors to the plant database! Garden Sages Garden Ideas: Master Level Seller of Garden Stuff I sent a postcard to Randy!
Sempervivums Sedums Region: Wisconsin Hosted a Not-A-Raffle-Raffle Celebrating Gardening: 2015 Avid Green Pages Reviewer
I put enough in the bag to make it about 3/4 full. A little less is fine but I wouldn't put much more than that in or you won't have room in the bag to put your hand to work with it.

Thumb of 2010-07-06/goldfinch4/59bfc8
Image
Jul 6, 2010 2:00 AM CST
Name: Chris
Ripon, Wisconsin
Charter ATP Member I was one of the first 300 contributors to the plant database! Garden Sages Garden Ideas: Master Level Seller of Garden Stuff I sent a postcard to Randy!
Sempervivums Sedums Region: Wisconsin Hosted a Not-A-Raffle-Raffle Celebrating Gardening: 2015 Avid Green Pages Reviewer
Next hollow out the center by squeezing the tufa between your fingers and the edge of the baggie. As you're doing this make sure the thickness is about the same all the way around the edge. Also press some on the bottom. The sides and bottom should be 1/2" - 3/4" thick.

Thumb of 2010-07-06/goldfinch4/9a5748
Image
Jul 6, 2010 2:03 AM CST
Name: Chris
Ripon, Wisconsin
Charter ATP Member I was one of the first 300 contributors to the plant database! Garden Sages Garden Ideas: Master Level Seller of Garden Stuff I sent a postcard to Randy!
Sempervivums Sedums Region: Wisconsin Hosted a Not-A-Raffle-Raffle Celebrating Gardening: 2015 Avid Green Pages Reviewer
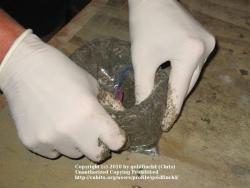
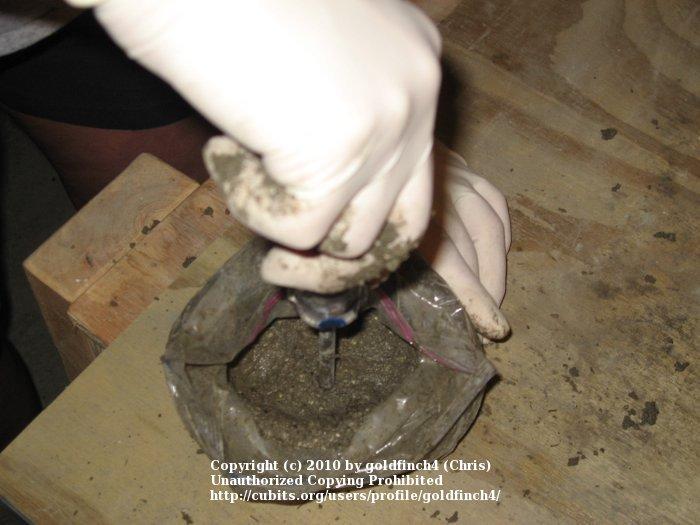
Since you want a rounded pot but the baggie has corners, make sure the corners of the plastic are not stuck inside the tufa - keep pulling the plastic out as you firm the tufa. If the plastic gets stuck inside the tufa, when you remove the plastic it will tear chunks of the pot off with it.

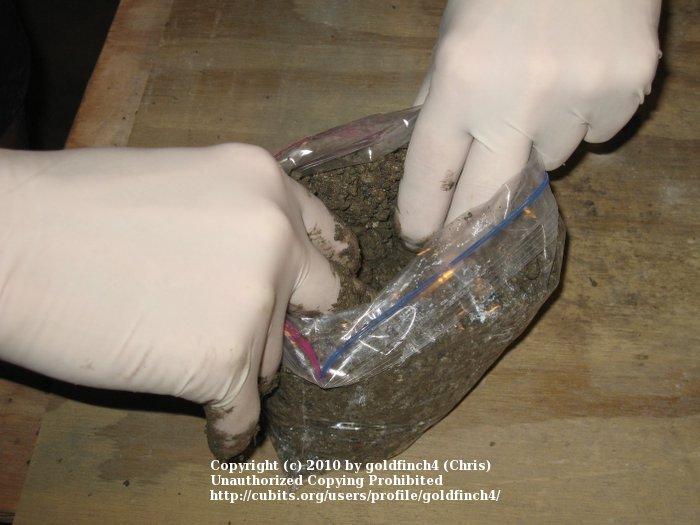
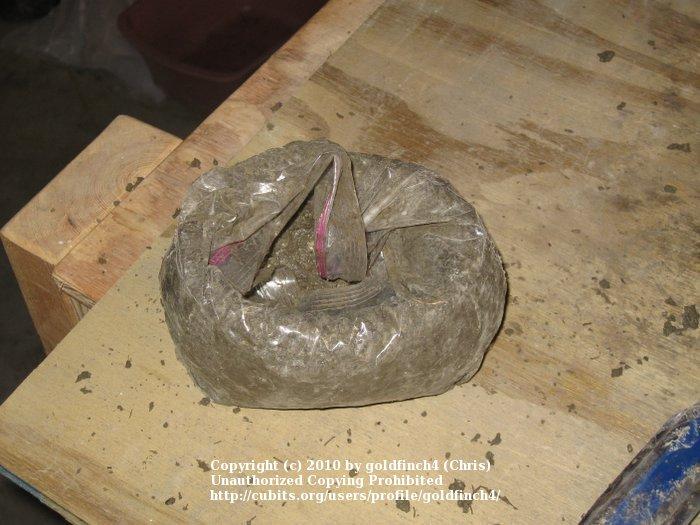
Also in this picture you can see how I fold the top of the bag to the inside. This way you can squeeze the tufa between 2 layers of plastic to keep the shape.

Thumb of 2010-07-06/goldfinch4/8eb6a2
Image
Jul 6, 2010 2:14 AM CST
Name: Chris
Ripon, Wisconsin
Charter ATP Member I was one of the first 300 contributors to the plant database! Garden Sages Garden Ideas: Master Level Seller of Garden Stuff I sent a postcard to Randy!
Sempervivums Sedums Region: Wisconsin Hosted a Not-A-Raffle-Raffle Celebrating Gardening: 2015 Avid Green Pages Reviewer
Keep squeezing and forming the pot until it reaches the desired shape. When you're done it should stick together solidly but not have any liquid standing in the bottom. It will be a tiny bit shiny from the liquid though. If it looks at all crumbly it isn't wet enough and won't stick together, so dump it back in the mixing container, add more water and start over.

Thumb of 2010-07-06/goldfinch4/19ee89
Image
Jul 6, 2010 2:17 AM CST
Name: Chris
Ripon, Wisconsin
Charter ATP Member I was one of the first 300 contributors to the plant database! Garden Sages Garden Ideas: Master Level Seller of Garden Stuff I sent a postcard to Randy!
Sempervivums Sedums Region: Wisconsin Hosted a Not-A-Raffle-Raffle Celebrating Gardening: 2015 Avid Green Pages Reviewer
You should now have your pinch pot formed. You want to try not to move it from here on in, or move it very carefully. Since this is not a solid mold if the sides flex when you try to move it, it will crack and when you remove the bag it will break.

Thumb of 2010-07-06/goldfinch4/0cd01e
Image
Jul 6, 2010 2:19 AM CST
Name: Chris
Ripon, Wisconsin
Charter ATP Member I was one of the first 300 contributors to the plant database! Garden Sages Garden Ideas: Master Level Seller of Garden Stuff I sent a postcard to Randy!
Sempervivums Sedums Region: Wisconsin Hosted a Not-A-Raffle-Raffle Celebrating Gardening: 2015 Avid Green Pages Reviewer
Open the baggie and form a drainage hole in the bottom of the pot with a screwdriver. This is another step where you can tell if your mixture is the correct consistency. The hole you formed should remain open. If the mix slides back together where you made your hole, it's too wet. If it crumbles apart, it's too dry.

Thumb of 2010-07-06/goldfinch4/95d164
Image
Jul 6, 2010 2:23 AM CST
Name: Chris
Ripon, Wisconsin
Charter ATP Member I was one of the first 300 contributors to the plant database! Garden Sages Garden Ideas: Master Level Seller of Garden Stuff I sent a postcard to Randy!
Sempervivums Sedums Region: Wisconsin Hosted a Not-A-Raffle-Raffle Celebrating Gardening: 2015 Avid Green Pages Reviewer
OK, the pinch pot is done. Fold the plastic back over the pot, gently place another lightweight piece of plastic (like a plastic grocery bag) over the top to keep the moisture in and let it sit (without moving) for 2 days to harden.

(Oops - I'll add the pictures of removing the baggie when I get to that stage.....my pinch pot is still in the 2-day waiting stage.)

Thumb of 2010-07-06/goldfinch4/e4a4e1

You must first create a username and login before you can reply to this thread.
Member Login:

( No account? Join now! )

Today's site banner is by IrisLilli and is called "Purple Crocus Mix"

This site is protected by reCAPTCHA and the Google Privacy Policy and Terms of Service apply.