
So over the weekend, we saw this other infomercial where they are promoting this certain type of juicer. In my other blog, I have said we are more of a blender in our veggie/fruit drink. Evaluating the aspects of the juicer we saw, and seeing other similar products online, we thought, maybe to have a better comparison, we should try getting a juicer as well.
Interesting array of juicers on the market. As much as I can find them online, I really want to see them right in front of me, to get a better feel of the product. At the same time we were also reading extensively of actual reviews from other consumers who bought similar product. Cost & quality. There are cheaper brands, but I see the feeding tube is too narrow, or the removable parts looks flimsy, or the base itself looks substandard, the plastic parts seems to be the brittle kind etc.etc.. There are the higher ends ones too, which at the prices they are being sold it feels way too expensive for our pocketbooks.
In the end we chose this juicer from Breville - juicer fountain plus. Maybe a tad big on the kitchen real estate space, but this is due to the peripherals, the pulp container and 1 liter juice jug. But otherwise we like the 3-inch wide feed chute and that 1 liter juice jug has calibrations so you can visually gauge how much juice has been extracted. For any good there is a bad..I guess the only downside I see is the very noisy motor when it is run, but for the quickness it extracts the juice, you would not run it far too long. Hey, that noise itself will surely wake you up if you juice in the morning haha! And of course, like any kitchen utensil, you have a lot of clean up to do. I like the pulp container catcher, it ably catches a sizable part of the pulp, you can line it with a small plastic baggie to help in the clean-up chore. The other removable parts are dishwashing machine friendly but I prefer to handwash them. I also like the nylon bristle brush it came with, really helps removing all the stuck fruits on the blade basket. So how was the juice extraction itself? The juice we got is so good! Now we better understand why a lot of people prefer juicing, the texture is more fluid, easier to drink. On the other hand, if we want to have bananas, berries, flax seed, hemp milk in, the best way is still to use the blender.
So I guess what will happen is, if we want to extract juice from veggies and most fruits, then have to use the juicer..then once juice is extracted, we can blend it with the other stuff. A bit more kitchen stuff to clean out, but well worth the advantage of being able to consume healthy food!
Blend or juice..go for it!
Here's the juicer we got! Our new kitchen mainstay!

I can honestly say I am not your poster child to eating vegetables. I can eat tomatoes, onions, potatoes, diced carrots but the green leafy ones no. I just don't like them. I can get away eating some if I grind and roll them eggroll style. We have this fiipino dish called lumpiang shanghai..yum! But still has ground meat with it. Another version of lumpia called lumpiang sariwa (literally meaning fresh spring roll) is a combination of rolled up veggies like cabbage, lettuce, or sometimes heart of palm..etc..anyways, this style of lumpia I don't like, but it does look appetizing, and it is very yummy as per those who love it, or I can add some very finely chopped veggies in our filipino chow mein called pancit, and that is as far as I will go..but count me out..sorry, I am just being frank about it, do not want to waste the food or appear an ingrate if offered a straight veggie meal.
But I have come around slowly..am now learning instead to drink my veggie. I was watching an infomercial and saw this kitchen device and I thought, hey, we have that, but brand name is different..but basically the same. Ah the marketing ploy of companies when they introduce products. But I digress...so thinking about that..did some research and it seems we can do that easily, just taking it baby steps for now.
So the next question is, which meal do we replace with this beverage veggie/fruit meal. Breakfast...hmm, nope..my hubby says he would not like to deal with an upset tummy early in the morning while at work, makes sense...lunch..well he is at work, and I am at home..so the remaining one is dinner. Okay, I think dinner it is. But we will do this on alternate days, on the days my hubby go on his gym visits. At least make it more consistent of having a light drink after his gym, instead of having a full dinner meal..kind of defeats the purpose I think heheh!
The best part is there is a lot of online recipes of healthy veggie/fruit drinks. Even read about the debate going on between blending and juicing..so far we are on the blending side . And I think it makes more sense too. So far have blended in baby spinach and some spring greens..carrots will follow soon, and with these we add bananas, apples, pears, grapes, berries.
So far doing good. At first it felt a lot of tendency to burp or gas..but you do feel very light. Our typical dinner is heavy on carbohydrate since rice is a staple for us. We have since replaced white rice with brown rice. But on veggie/fruit drink night, no carbs, so it was a bit of an adjustment. I am learning now of some things I can add to my drink which I can also add to some things I cook..like ground flax seed. Never ever used that before..so something new to learn and enjoy! In the meantime..I can happily say I enjoy drinking my veggie!
I am always on the lookout on ways and means to further improve my orchid growing skills. As newbie as I am, it has been an exciting learning curve knowing what type of orchids can safely grow in my area, trying to make them survive our local conditions and adjusting my watering regimen as the seasons change.
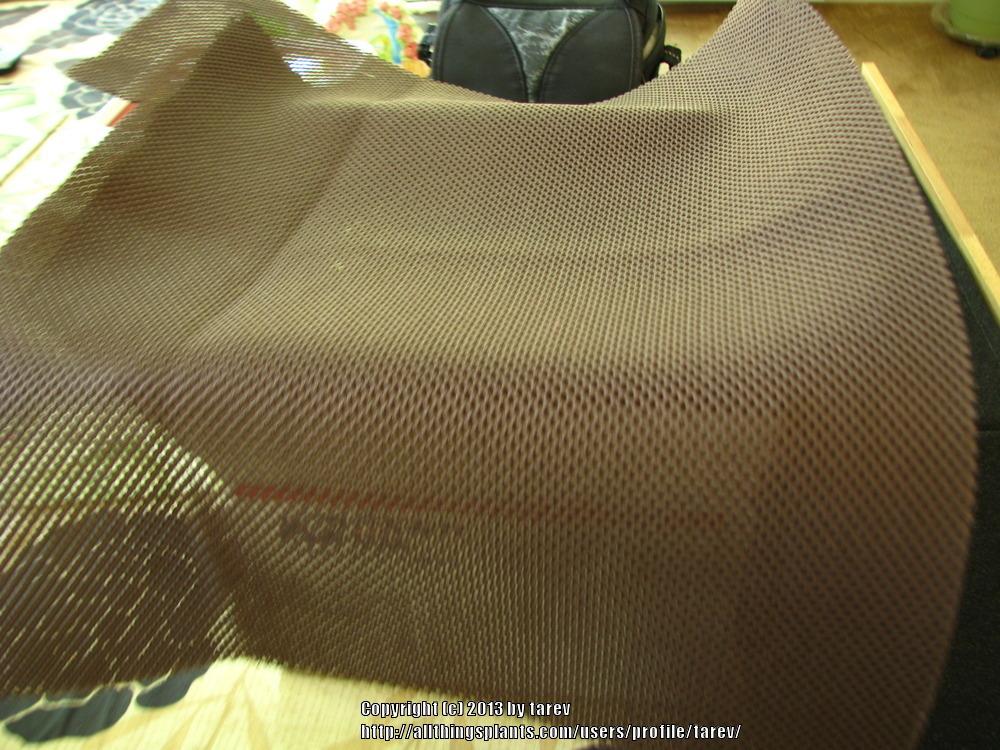
Recently I came across this product called Hygrolon, a fabric mesh that is porous enough to allow good air circulation and wicks water, so it can retain some moisture without rotting the roots. Most of the users I have seen posts their set-up in conjunction with terrariums or vivariums. I intend to use this for my orchid media, as a replacement for sphagnum moss.
Last Spring, I have made an experiment using stockings with styro peanut fillers and some sphagnum moss for one of my temperamental noid Phalaenopsis. This plant always dries out way too fast in bark mix, so I had to find another way of providing moisture on its root zone. Our area being so dry and drier as summer season goes on makes a toll on some of the orchids. After all they are tropical plants, and they need a good level of humidity to thrive. So knowing that hygrolon is a fabric mesh, and acts like my stocking baggie, I think it will also work!
This is how Hygrolon looks like: it can be cut into any shape or size as needed.
And this is the noid Phalaenopsis I will experiment on. In this photo, it shows how the roots have eagerly penetrated the stocking baggie I made which had a small amount of sphag moss and some styro peanuts inside. This one I did in early Spring 2013, when I transitioned the plant from bark mix to stocking baggie media. So obviously the roots of this plant is one eager moisture seeking one. But I really want to do away with sphagnum moss..it always stay way too wet for my liking at times and it decomposes too. I want something that will stay on for long so I will not have to repot often.

I had to wet the roots and the stocking baggie a bit to remove the roots safely without breaking them..love those thick healthy roots!

Just some trimming of some older roots from before, and it sure looks like one happy Phal prospect for my new potting experiment.
So back to Hygrolon, made some baggies similar to previous experiment, but this time, using styro peanuts and some leftover leca rocks as fillers. To be honest, I am not sure if I should have included leca rocks or not, but then again, just in case the roots penetrates again the hygrolon membrane, it will still find some more moisture to cling on inside safely. It is easy enough to do the baggie, just some minor sewing on the sides..you can even use glue if you want.

So repotting the plant back to its clay pot container. I placed some loose styro peanuts below, cut small portion of hygrolon fabric to put on top of the styrofoam peanuts, then settled in the hygrolon baggies, carefully sandwiching the exposed roots. Sandwiching the roots with the baggies makes it easier to keep the plant upright, no need to stake it. I have presoaked the hygrolon baggies briefly, it does wick quite fast, so no overnight soaking needed like usually done with bark media.

So that's the final set-up, the plant goes back to its vertical hanging pole, getting good moisture on the roots and good airflow as well. So will see how it goes later on..especially come winter time!
Plumeria Odyssey...I call it as such since it took about 3 years and 4 attempts before I got a cutting to root.
Call it persistence on my part, but I simply cannot understand then how I can always fail to get cuttings to root, knowing that it is a succulent and I have been growing succulents for quite awhile now with good success. Plumeria had me blindsided quite a lot. A very long and winding learning curve..so frustrating that at times I wanted to give up. But I am glad in ATP we have very good friends who helped a lot in maintaining my interest peaked.
Anyway, just focusing now on this successful 4th attempt. To give a short background, after being miserable in my other attempts, I got this one in July at a Japanese bonsai store in San Francisco. So have potted it up, and kept fingers crossed. This time around, I added pea gravel on top as mulch. Have read somewhere it helps trap the heat below. So I figured not bad, I can do that. And have located a specific place in my garden where the cutting can get part sun and shade to help it acclimate and also a place where I can leave it alone. That has been one of my mistakes before, putting the cutting right away in full sun, or in having to move the plant in and out a lot in Spring. I guess the cutting did not like that amount of disturbance. So into that corner, behind the calamondin tree.
This was its initial set-up, had it acclimating for a few days, before going behind the calamondin tree. The very daunting tip I am going to watch for the next few weeks hence:


So it took about 2 months for this cutting to finally open one good leaf! Hooray!
The days of waiting comes with good outcomes at last! Rooting is in place and now I can really give the plant some good watering...been so eager to do that..have just been giving it some occasional misting or sometimes a slight sprinkle before.

Well the next goal is to get more leaves out, and of course get some blooms..but I am running out of summer. And I have read that most growers do not anymore give fertilizer in September so that the plant can gradually prepare to its slumber mode during the cold season..ah life! Just when things are getting interesting! Well, in the meantime, I will take it one leaf at a time..will see how far along this cutting will mature before it starts to sleep again.
For now..I count three open leaves...woohoo!

Ah but before I forget, during those two long months of waiting for the leaf claws to form and mature, I took a back-up of getting a rooted plumeria. I got it from another ATP member, Ken (thanks Ken!) and I got the Plumeria Celadine. This Plumeria is growing very well and is busy forming new leaves too. I am glad I got this plant too, I got to see how the roots look like, and how really mature leaves grow as well.

I am so excited to see how things fare out later on..I wonder which one will give me its first blooms, what will they look like, which one will go to its dormancy first, which one will come back better next year...ah..so many questions...so got to continue watching and learning as it goes..the fun continues!
It is so beautiful to see the city trees lining up my sideyard. Tall and full of leaves, ably shielding our house from the hottest part of the day, swaying side to side as the wind blows. A natural shield that affords privacy too, high above our fence line.


Ah..but every form of beauty has its own set of upkeep. As the seasons change...we get all sorts of debris. During spring, the leaf kernels and catkins, as the trees start to awaken from its winter slumber:
These days, as it is the middle of summer, normally we get the occasional falling leaves, but it seems the volume of leaf fall is like that of Fall season already..just a lot coming down, but I think it is the long, long dry season we are having, too little rainfall, dry as rock...so watering is a must. Am I glad we opted for pavers, at least no grass to worry about.
Now part of the upkeep, involves the gutters. We have delayed that for awhile now, since we are trying to come up with an efficient way to reach and clean the 2nd storey gutters. Ah, the downside of a 2-storey house..but it is what it is..
Last year, we got this product called i-Robot looj, a robotic device you can put in the gutter to clean out the debris stuck there. It will not be a problem to the lower gutter, easy enough to access with simple ladders, but the 2nd storey ones are harder to reach. Got to have extra long, stable ladders for that. Now, the options we have are either to hire a gutter/window cleaner or maybe think about replacing our gutters with the types that have a mesh cover to help prevent build ups inside. Either way will be expensive. So we opted to try this looj.
The looj has a front auger that breaks, crushes and throws out the leaves and debris as it moves through the gutter, with a remote control, you can do it manually or just do it remotely in clean mode, so you can wait below as it finishes its task.
Here's the photo of the gutter, with leaves accumulted for the past 5 years:
Putting the looj in the gutter:

And the end product afterwards...finally clean..:

It is better to see it in action:
http://youtu.be/05zJGtzqriA
But as with anything that includes climbing ladders..foremost need, no fear of heights..steady balance..you can count me out..I am like a cat, can climb up but not climb down..hahah! We did have ladder stabilizers attached and the ladder is long and sturdy enough to carry someone up there. Actually I think the hardest part was setting up the ladder..it is heavy..we may need to attach ladder pulleys next time.
Well, the best part..my hubby enjoys climbing ladders and trying gadgets..so one less chore for me!