
Start with determining a focus for what you want to achieve. God bless him, David Kirchhoff spent an hour with me when I was just starting, helping me to define my focus. The narrower your focus, the more chances you have of getting it. I started off with doubles, polys, and reds. 10 years later I'm still focusing on those 3, plus patterns. I also cross pinks just because I adore pinks and want more of them in my garden. Work for what pleases YOU.
I learned from lots of the top hybridizers that you should work with the highest quality daylilies you can afford. That doesn't necessarily mean the newest, but it often does. A couple of weeks ago I got to visit David and Mort at Daylily World in Kentucky. I spent time with each of them, discussing their hybridizing programs. I asked David to tell me which of his doubles he'd recommend the most for hybridizing doubles. Along with several of his newer introductions he recommended Margaret Tucker. Though it's 15 years old it's still a valuable asset.
Dan Hansen drilled into me that it's easier to put a pretty face on a good plant than the other way around. He hybridizes for plant habit first. I try not to cross with anything that has less than 4-way branching and 20 buds unless there is a particular reason to. Check the plant's vigor. How well does it grow and multiply? Is it finicky? Does it grow well in your area? It's heartbreaking to shell out big bucks for a recent introduction only to lose it to the wrong habitat. Check local nurseries to see what does well for them. The AHS popularity polls will tell you what the favorites are for your region. Another thing to look for is good "substance" in a bloom. Does it "melt" and look bad at 2 o'clock or does it hold up during the day?
Visit as many nurseries as you can so you can familiarize yourself with what's out there. When you see daylilies that you like, find out who hybridized them and who their parent plants are. You will quickly develop favorite hybridizers and get to know their style. After you've been at this awhile you can often tell who hybridized a daylily just by looking at it. Research the parents of plants you like and see if they have other registered offspring. Can you discern which traits they are likely to pass along? You may find that several of the plants you like share a common parent. That one would be a good bet for your stable of daylily studs.
I recommend the PlantStep software by Kent Balen. It's very reasonably priced and will help you track your plants as to bloom and growth. It also has a hybridizing feature that lets you compare plants and plan crosses and study the pedigree of plants you're thinking of using. When your seedlings bloom you can track them as well, to spot common characteristics thrown by a particular parent.
When doing your crosses, be aware of the temperature. It is my understanding that stigmatic fluid starts flowing at about 80 degrees. It's what comes out of the end of the pistil to activate any pollen that is there. Dan Hansen taught me that after a bit it dries and seals off the end of the stile. Once the tip is sealed it won't accept any more pollen. You need to have your chosen pollen in place before the tip is sealed.
Several folks have told me that pollen starts to degrade above 90 degrees. I try to get my crosses done before the temperature hits 80 to beat the stomatic fluid to the end of the pistil. If I'm collecting pollen to use later I harvest before 90. I've heard some people say they can successfully set pods in temps above 90. I haven't found that to be true. When temps get into the mid or upper 90's I can't get pods to set even if I've gotten the pollen on before temps reach 80.
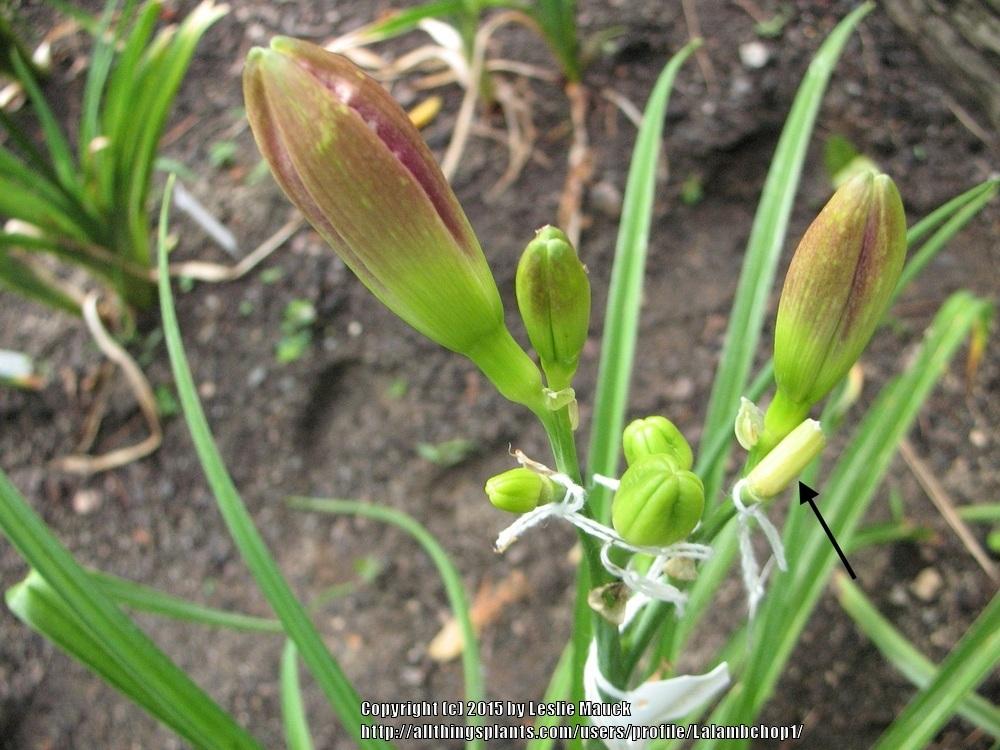
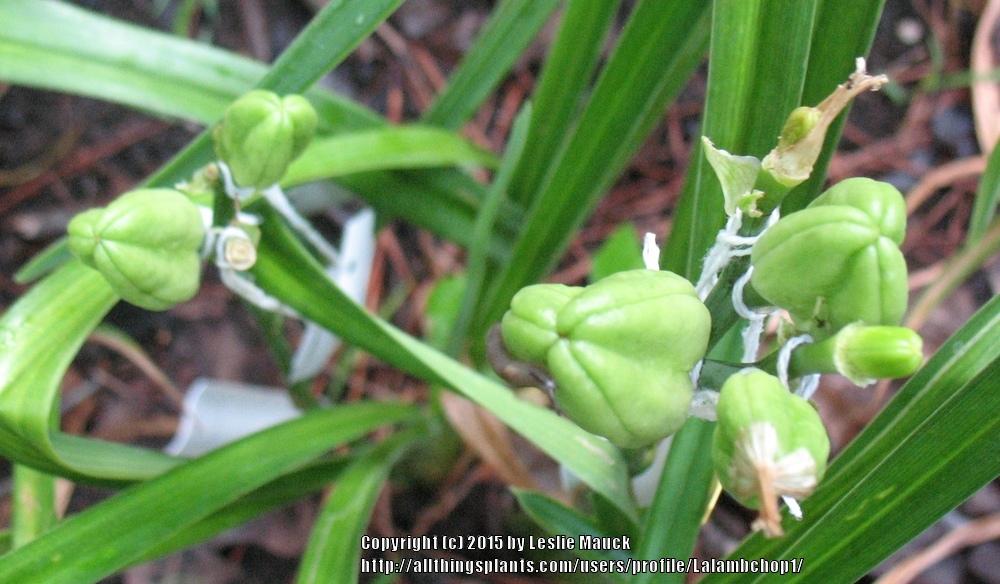
You can tell whether you've got a pod started about 3 days after you make a cross. Deadhead spent blooms so they won't pull off newly developing pods. After 3 days the base of the bloom will fall off if it hasn't been fertilized. If it hangs on, you probably have a pod forming. Sometimes pods fail. This could be from too much heat or lack of water. If you are doing the best you can as far as growing conditions, don't worry if they fail. It just happens sometimes. The following image shows a few young pods in different stages of development. The arrow is pointing to what remains of a spent bloom. Notice that there is no swelling at the base. This bloom wasn't fertilized.
Here are some tools I've found helpful with hybridizing:
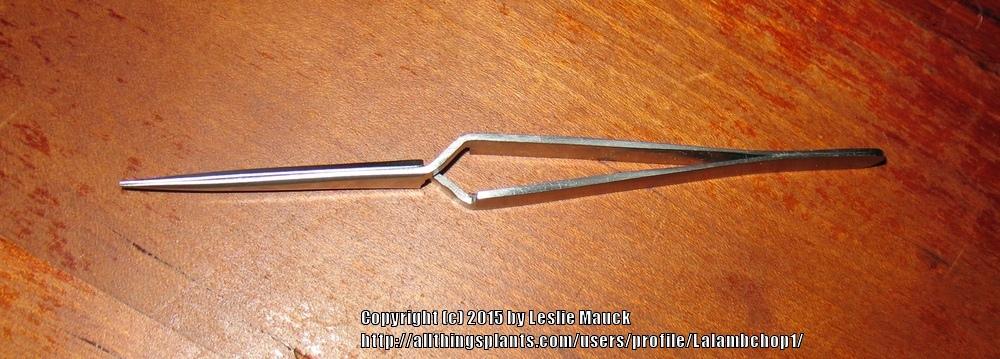
Reverse tweezers. They stay shut until you press to open them. They are invaluable for holding pollen while you're hybridizing, especially if you only have the anther.
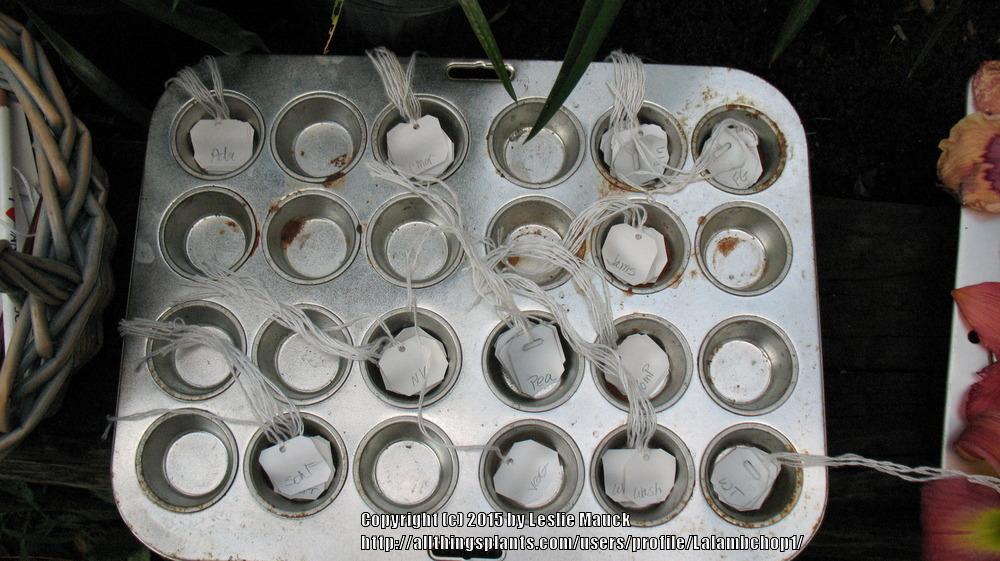
Pollen Tray: Someday I hope to have a "muffin" series to honor my muffin tins. Every day I pick the blooms whose pollen I want to use tomorrow and store them in the fridge overnight. Use your nails to incise the area around the base of the bloom so you can take off the bloom but leave the ovary and pistil. When I go out to do my crosses, I have pollen all ready and don't have to wait for it to ripen. This makes a big difference in areas where temps go up quickly.
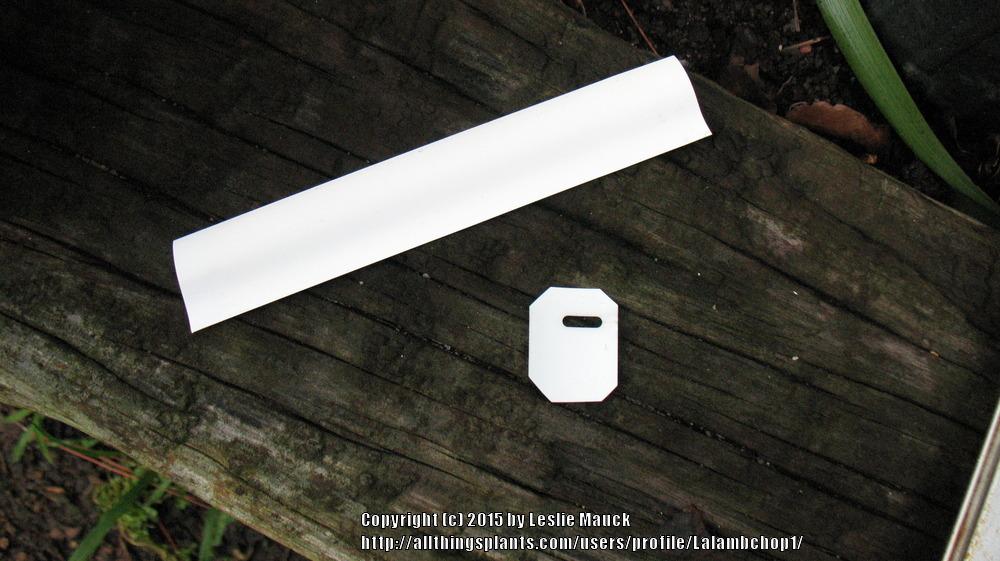
Tags: I have learned the hard way that paper hang tags {to show which pollen you've put on a plant) often get lost. This year I found a mini blind at a yard sale and cut it to make hang tags and plant tags. Plant tags can be cut into lengths of about 4 inches. I put one of these behind each plant or row of plants in case the metal name plate should get moved. I'm paranoid about making sure I know which plants are which.
To make hang tags, I cut the blinds into about 1" pieces and use a hole punch to make a hole if necessary. When cutting the blind, I use the pre-made holes first. Then I loop a piece of string through so I can affix it to the bloom base. I've found embroidery floss is good for this.
I make out tags with names of the pollen parents ahead of time and organize them in my mini muffin tin. That way I don't have to use valuable time in the morning doing it. I write the name of the pollen parent on the lower part of the tag. If the pollen takes, I write the name of the pod parent in the upper part of the tag when I harvest the pod.
Pod Bags:
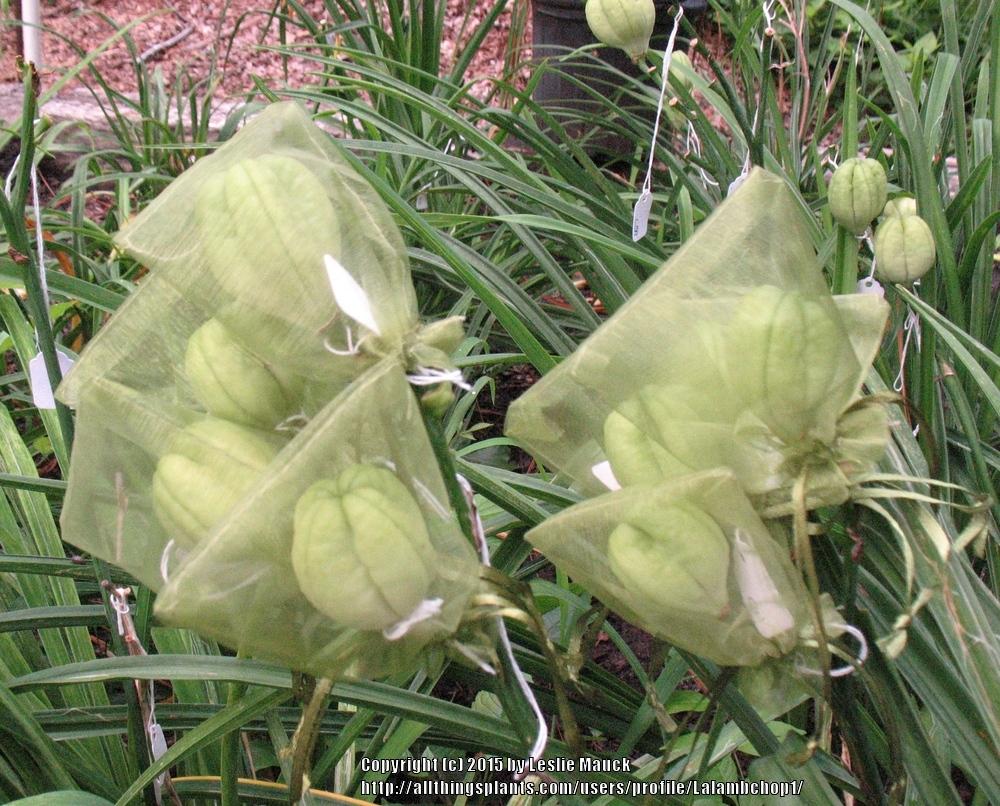
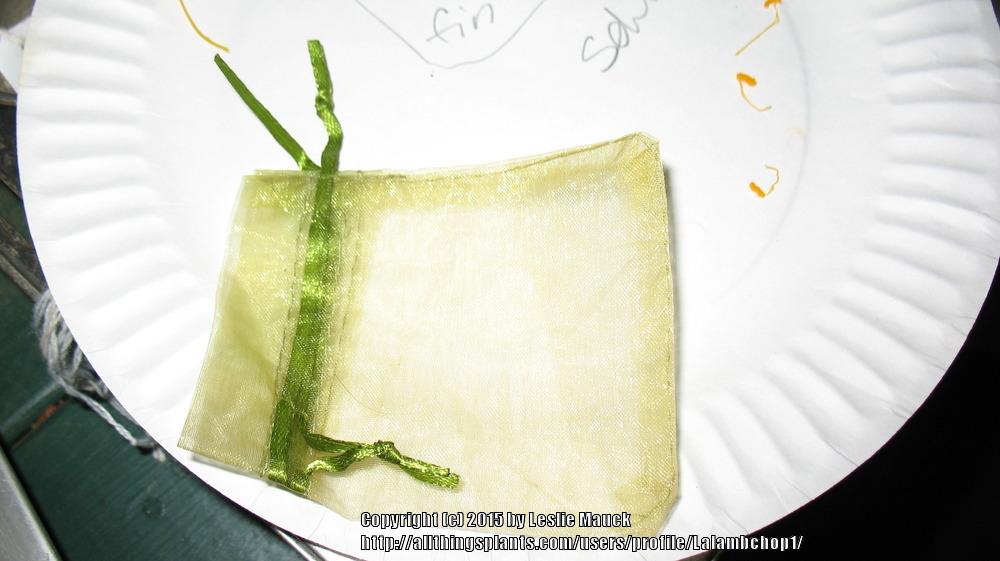
It's heartbreaking to find a pod that has cracked open and spilled out some of the seeds. I found these bags on Amazon. Once the pod gets some size on it, I cover the pod with one of these bags. When the pod is ready to harvest, I add the name of the pod parent to the hang tag and tuck it into the bag with the pod. My genetic info and the pod are all safely within the bag. You can find these on Amazon, or sometimes in a wedding shop.
I'm a big believer in online research as well as taking careful garden notes. There are some plants that are beautiful, but they don't grow well or aren't good parents. Check the AHS database to see whether there are registered kids from the plant in which you're interested. You could also call hybridizers and ask them about their plants. Some are more honest than others (Rolling my eyes. LOL). If you're into doubles, call Jan Joiner, David Kirchhoff, Tim Herrington, or Nancy Eller. I've discussed their plants with each of them and received good info. You could also ask ATP members which plants they would recommend. We have some really talented hybridizers at ATP. Facebook has lots of DL groups that you can join. They may have one that's right up your alley.
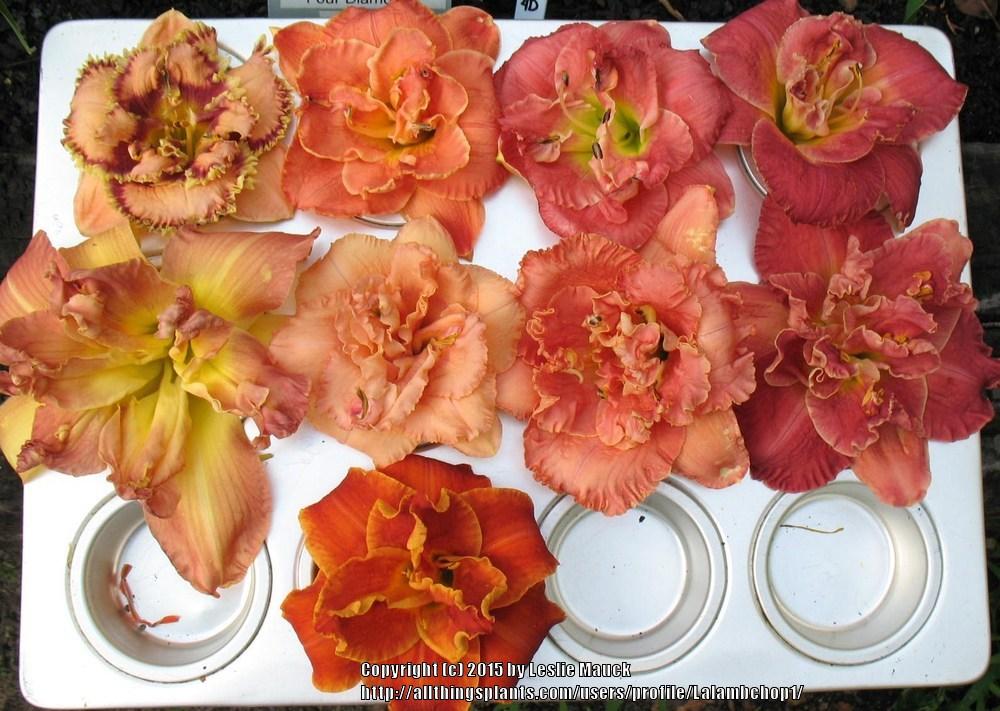
I take lots of pics. I like to compare blooms throughout the season and it's a good way to document plant growth. On each one I make a note of the date so I can see what they do from month to month and year to year. Pictures are also a good way to document the branching/bud count or fertility of scapes. These are from the aptly named Incredible Pedestal and Jelly Basket.
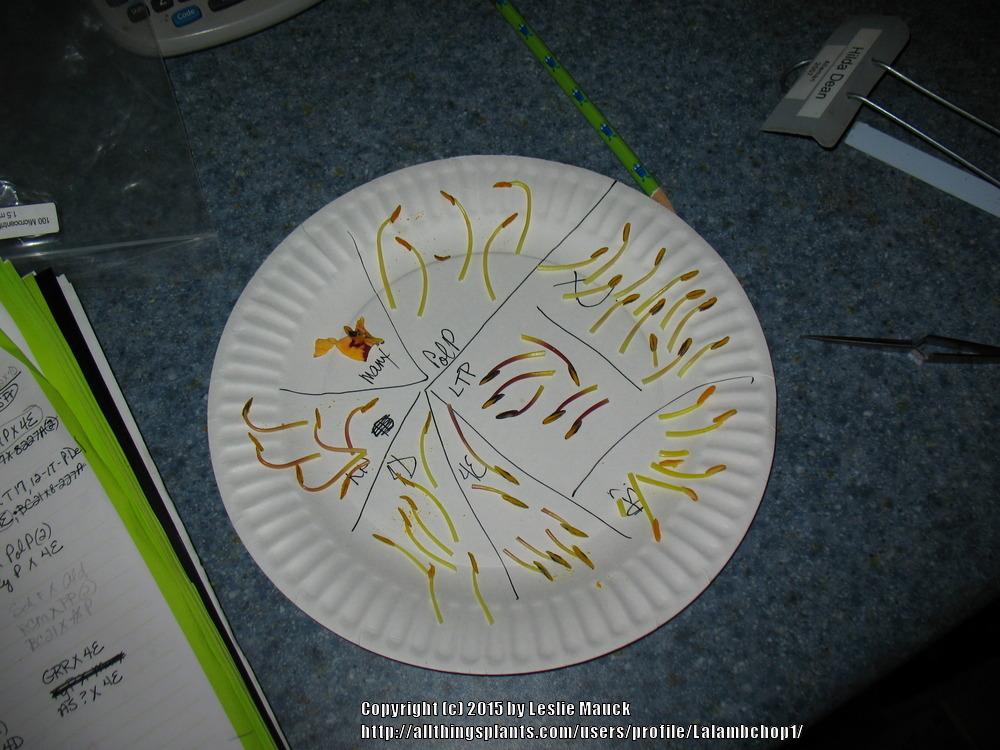
If you want to try to extend your season, you can freeze pollen. Here's a trick I learned from Curt Hanson. Take the stamen, with anthers attached, of pollen you want to save and lay them out on a paper plate. Use the cheap ones without the plastic coating. Leave the plate in a cool place where it won't be disturbed for a couple of days. The stamen will dry out and stick to the plate, leaving the anther with your precious pollen easy to remove with your trusty reverse tweezers.
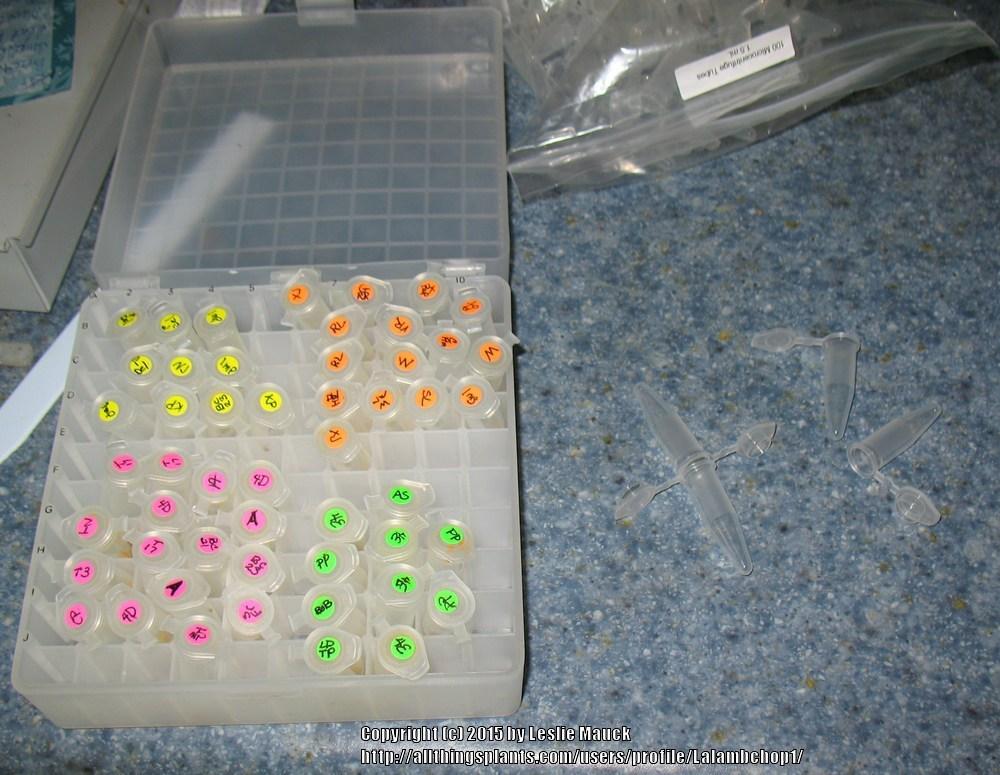
You can freeze the pollen in the micro-tubes they use in labs. The tubes are available on Amazon. I color code the labels for each tube according to the program I'm using them in: tet doubles, dip UF doubles, tet polys, etc. I have a mini fridge in the basement in which I keep the pollen boxes and blooms whose pollen I want. Each morning I go out to see who's blooming and then take out the pollen/blooms I need for that day.
I had a huge V-8 moment this year in trying to find out why my pollen wasn't working. I'd been putting the tubes in my bra to "thaw" while I did my first crosses with fresh pollen. I didn't think until later that my 98.6 body temp was way over the 90 mark at which pollen starts to degrade.
When using frozen pollen, always let it thaw before opening the tube. If you don't, you may get moisture in the tube and that will wreck your pollen. I learned a good tip today on working with frozen pollen from Tom Bruce of Carolina Daylilies. He said he uses it extensively. Since you take the risk of introducing moisture into your pollen tube every time you open it, he only puts one or two anthers into each tube. What a great idea.
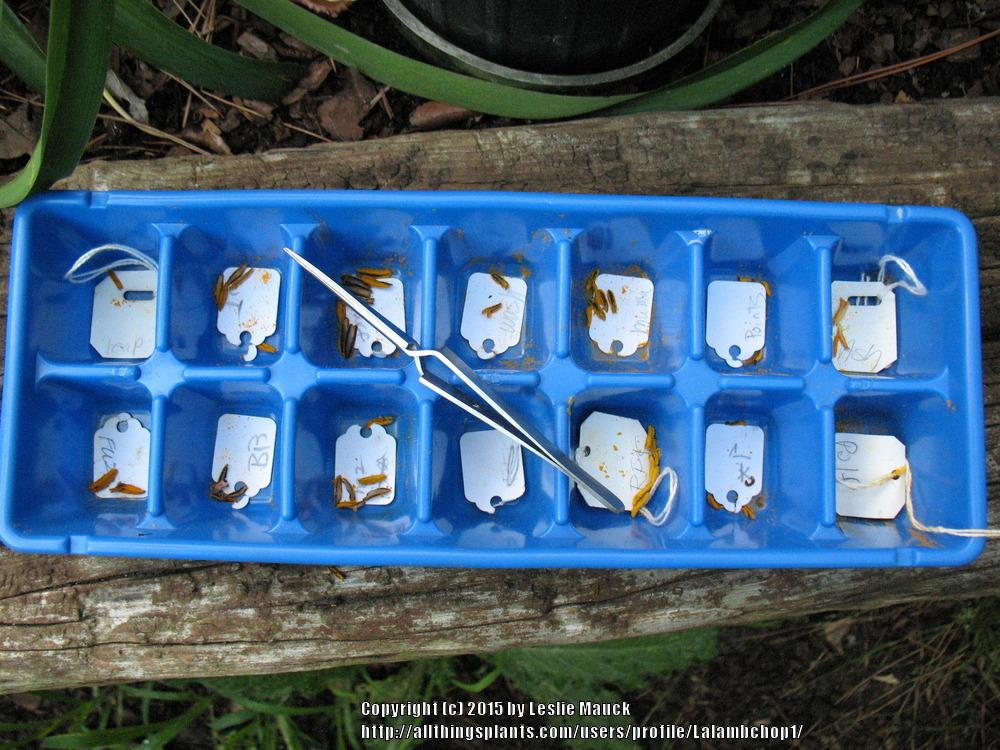
I also wanted to post a pic of what I call the "Jeffcoat method" of saving pollen. Jim and Peg Jeffcoat showed me this one last year. They don't work with frozen pollen. They use an old-fashioned ice cube tray to sort their fresh anthers. They keep the tray in the refrigerator and refresh the stock of each variety as new blooms appear. Couple that with reverse tweezers and you're good to go.
I've added the names of several hybridizers in this little article, not to "name drop," but because I greatly value their expertise and thought you might like to know where I'm getting my information. I've been blessed by the generosity of lots of daylily folks in my travels.
Whatever method you use, do try hybridizing. There's nothing like seeing a seedling bloom for the first time and knowing that there's no other plant on Earth just like that one.
Good luck and God bless,
Lalambchop1/Leslie Lamb Mauck
| Thread Title | Last Reply | Replies |
|---|---|---|
| Thank you! by DogsNDaylilies | Aug 14, 2015 4:40 PM | 25 |
| stigmatic fluid by admmad | Jul 31, 2015 5:34 PM | 1 |
| Great Article, Leslie by rocklady | Jul 29, 2015 9:49 AM | 7 |


